Thursday, July 18, 2013

Automatic Furnace (and 2 variations)

Ok. So i just got back from vacationing out of state & have been unable to blog any, so i apologize for the delay. I found this automatic furnace on YouTube & experimented with it until i came up with 2 variations. in this post i will give you step-by-step instructions on how to make each one of these.

Automatic furnace (found on Youtube):
1. Place your chest on the ground. This will be your 'finished' chest.
2. Place a hopper on one of the sides (lift-shift & right-click)
3. Place a furnace on top of the hopper (lift-shift & right-click)
4.  Place 2 hoppers on the furnace; one on the side, one on the top
5. Place a chest on each of the hoppers (your 'fuel' chest is the side, & the 'to be cooked/smelted' chest is the top)
6. place your fuel in the side chest, food/stuff to smelt in the top chest. and let it do it's job.

The way this setup works is that the furnace is constantly fed fuel & material to be smelted/cooked while it is also constantly dropping the finished product into the 'finished' chest. this in convenient because as long as you make sure that it has plenty of fuel you can place as many things in top as you need smelted and go away to do some stuff & come back later and pick up your finished product at your leisure (& depending on how much you loaded the chests it will probably still be turning out smelted/cooked stuff.


Automatic Furnace (double):
The point of this chest is to be able to smelt/cook twice as much stuff in the same time as the single auto-furnace.
1. Place a double chest (2 chests right next to each other) on the ground.
2. Place 2 hoppers on the back of the chest
3. Place a furnace on each hopper
4. Place 2 hoppers on each furnace (one on the back, one on top)
5. Place a chest on each hopper (this will make a double-chest on top & in the back)
6. Load top chest with stuff for cooking/smelting & back chest with fuel


Auto-serving Oven:
 1. Place a dispenser on the ground and lay a pressure plate down in front of it
2. Place a hopper on the dispenser
3. Place a chest on the hopper, and then place a hopper on the chest
4. Place a furnace on that hopper
5. Place a hopper on both the top & side/back
6. Place a chest on both hoppers and fill the top with materials for smelting/cooking & the other with fuel.

This one is especially good for cook-able food items like potatoes, fish, chicken, etc as it cooks the food & then will store it in the dispenser until the dispenser is full. When the dispenser is full it will be stored in the first chest. What is great about this one is that when you need something to eat all you need to do is step on the pressure plate and viola! :D You can also put a button on the dispenser instead of using a pressure plate to activate, but i personally prefer the pressure plate.


Like my post? Follow and share my blog with your fellow Minecrafters!

Monday, June 10, 2013

Hostile Mobs - Upperworld - Minecraft 1.5.2

This post will be a intro to the basic hostile mobs in Vanilla Minecraft.


Zombies are slow, tough, mobs whose attack strength increases as they recieve more damage.When the sun rises, Zombies will catch fire and try to find shade or water to keep from burning. When a zombie is burning it will not catch blocks on fire, however it will set you on fire if it hits you. Attacking one Zombie will draw others to you, & if a Zombie kills a villager the villager will turn a Zombie as well. These mobs spawn in dark & dimly-lit areas in the upperworld. They drop rotten flesh & (rarely) armor, swords, or tools.

Skeletons are fast mobs who attack from a distance.When the sun rises, skeletons will catch fire and try to find shade or water to keep from burning. If a skeleton attacks you while it is burning you will not catch fire. Skeletons will chase any player they see within a 16 block radius. When they are within 10 blocks of the player, with a clear line of sight, they will stop chasing and start shooting the player with arrows. If the player moves more than 16 blocks away from the skeleton, it will cease pursuit. Skeletons will attempt to avoid damage from the player by continuously circling around them while in combat. They are found in the nether, and in dark & dimly lit areas in the upperworld. They drop bones & arrows & (rarely) armor & bows.

A creeper is a hostile mob that makes use of a suicide-style attack: It approaches players and then explodes, causing damage to players as well as surrounding blocks and entities. Creepers spawn in the overworld at night, and in dimly lit areas, just like most other hostile mobs; however, unlike zombie and skeletons, Creepers will not catch fire in direct sunlight, and those spawned in darkness will nevertheless continue wandering and attacking throughout the day. Creepers drop gunpowder. They also will drop music disks when accidentally killed by a skeleton.


 Witches are hostile, ranged mobs commonly spawning in Witch Huts (found in swamp biomes or, very, very rarely, other biomes). Witches have a similar appearance to the villager mob, and they wear purple and green robes with brown leggings underneath. They have large noses with a single wart and have lavender colored eyes. Witches have smaller mouths than villagers. They wear a stereotypical witch hat with a green buckle on it, and their skin is slightly paler than that of a normal villager. When killed, witches can drop a great number of items, including Glass Bottles, Glowstone Dust, Gunpowder, Redstone, Spider Eyes, Sticks, and Sugar. They drop 1–3 item types, each 0–2 times. The same type can be chosen multiple times, therefore it is possible to get up to six of one item, or up to two of 3 different items. They also rarely drop Potions of Healing, Fire Resistance and Swiftness, but only when they are killed while drinking that potion.


 A slime is a hostile mob, in the shape of a hopping green cube of various sizes. They are able to see the player through solid blocks, and will always try to move directly toward players without regard for obstacles or hazards. When killed, a slime will split into smaller slimes, except for the smallest slime which will drop slimeballs instead. Slimes are found in either the lowest 40 layers of certain chunks or in swamp biomes in darkness, depending on the moon phase.


The spider is an arachnid-like mob that is neutral in sufficient light levels and hostile towards the player at night and in dark, shadowy areas. They are able to see the player through solid blocks. A spider measures 2 x 2 x 1 blocks, with brownish-gray skin and red eyes that glow eerily in the dark. Spiders will often jump around when attacking, making them a moving target and harder to hit.They spawn in the upperworld in dark & dimly lit areas. Unlike zombies and skeletons, spiders will not catch fire in daylight. Spiders drop string (used to make bows, fishing rods, & wool blocks) and spider eyes (used to craft potions).

 Information including attack strength, AI personality, special abilities, & where they are found. The only differences between cave spiders & normal spiders is cave spiders are a different color, smaller, & they have poisoned bites (which can be cured by drinking milk).


 Endermen are neutral mobs that are 3 blocks tall and densely populates the end, and rarely spawns in the over world. Endermen will ignore players unless provoked by being attacked or being stared at (if the player is wearing a pumpkin, the Enderman will not notice you staring at him). It is almost impossible to hit an Enderman with an arrow. Enderman are also vulnerable to water, making it safer to hunt them in the rain or from a body of water. Endermen rarely drop Ender pearls which can be crafted with Blaze powder to make an Eye of Ender, or thrown to teleport.


Was this post helpful? Follow and share my blog with your fellow Minecrafters!

Friday, May 24, 2013

Tutorial - Minecraft Crafting Recipies - Combat

This post is about crafting weapons & armor for combat. I will show you how to craft the items, and explain their uses. Before I show you the crafting, I need to explain the different materials available for use. For armor, the materials available are (in order of weakest to strongest): leather, gold, iron, & diamond. For swords, the materials are (in order of weakest to strongest): planks, gold, stone, iron, & diamond. To craft a bow you need sticks & string.


To craft armor, right-click a crafting table and arrange the material you desire your armor to be made from as seen in the above pictures. You can WEAR armor of different materials (i.e. leather boots with iron helmet, diamond leggings, and gold chestplate), but when CRAFTING the armor you cannot use multiple materials (i.e. you cannot craft a piece of armor out of both gold & iron).


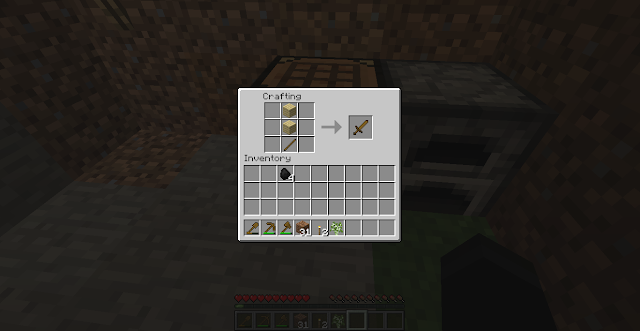
To craft a sword, right-click a crafting table and arrange 1 stick and 2 pieces of the material you desire your sword to be made from as you can see in the above picture. As with armor, when crafting the sword you cannot use multiple materials (i.e. you cannot craft a sword out of both gold & iron).


To make a bow you arrange 3 of each string & sticks as seen in the picture above. You cannot use the bow for anything other than hitting unless you have an arrow.
(P.S. unlike swords & armor there are not different materials you can use to craft a bow unless you download a special mod)


There are 2 ways to obtain arrows:
1. They are occasionally dropped by skeletons upon death
2.They can be crafting by arranging flint, sticks, and feathers as seen in the picture above (note: you get 4 arrows for every 1 flint, stick, & feather you use to craft an arrow)


Was this tutorial helpful? Follow and share my blog with your fellow Minecrafters!


Saturday, May 11, 2013

Minecraft - How to survive your first couple nights.

Some people are naturals at this and even when it is their first time playing have no trouble surviving their first few days in Minecraft... but other new crafters have trouble figuring out how to not get killed; I am in the last group. I died several times my first night and it would have taken me a while to survive if i hadn't found a how-to guide. I will do my best to show you my techniques for surviving the first days.

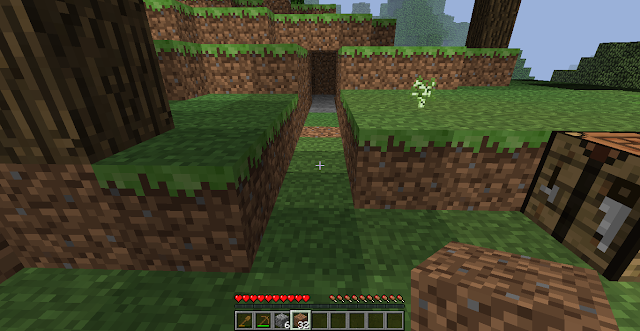
When i spawned in a new world this picture is the first thing that i saw. When you spawn it is midday in-game, so you need to hurry to find shelter on you first night.


The first thing you need to do is to find and harvest a tree.


Next, craft the wood into planks


Use 4 plank blocks to make a crafting table, and place it on the ground.


craft 2 of the planks into sticks. I need to place emphasis on using only 2 planks... i have all too often crafted ALL of my planks into sticks and wasted time trying to gather more wood.


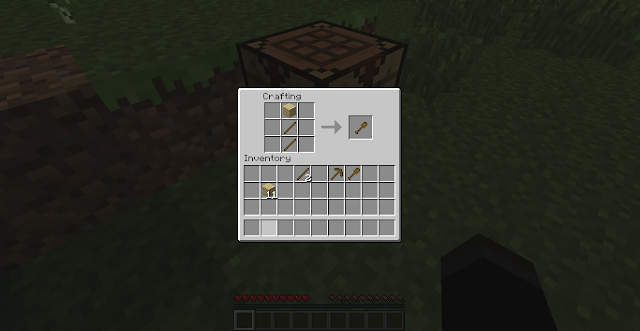
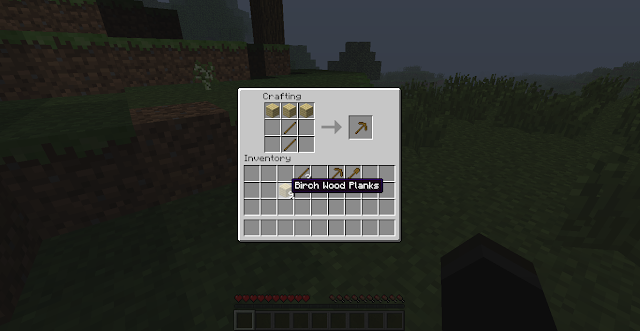
the next step is to create the 2 tools seen above; a shovel & a pickaxe.


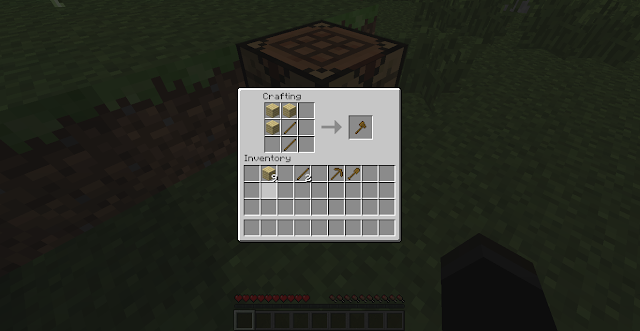
if you have at least 5 planks, the next thing that you might wish to craft are sticks, and then an axe.


the next thing you need to do is to dig a small hole into the side of a hill... think hobbit hole. remember, the important thing is that you make a small room. If you make the room as big as possible, monster will spawn inside when it is dark at night. until you can light it, the best thing is to keep your room small.


use 6 planks to create a door, and save it in your inventory for later.


next use some of the cobblestone that you most likely picked up during the digging and craft a furnace (if you do not have enough you might want to keep excavating your room until you have at least 8 cobblestone (remember to fill it back in with dirt until it is small again).


use the axe you crafted earlier to harvest another tree (or if you didn't, use your fist)


place the wood blocks in the top slot of the furnace, and a wood block in the bottom smelting slot (if you have some leftover, you can also use planks & sticks like i did).


take the first piece of resulting charcoal and place it in the bottom slot (when it disappears it is being used)


as the wood smelts, it will create more pieces of charcoal


by this time it should be dark out or getting close, place the door that you crafted at the mouth of your little 'Hobbit Hole' and take your crafting table inside.


when you get inside take the charcoal from the furnace and place it in your inventory. take a stick and a piece of charcoal and use them to craft 4 torches.


now that you have torches, you may expand your shelter as you see fit, as long as you keep it well lit.


wait for the safety of daylight, and then craft a sword. If you do not have enough materials to craft it, you may want to harvest a tree first. (If you are running out of trees, plant some saplings to grow more)


use the sword to go out and kill some food... i found some chickens!


NEVER eat the chicken raw, if you do you will be poisoned (you can also eat rotten flesh, however it will do the same thing)


if you want to store some stuff for later, craft a chest or two and transfer your stuff.


find some sheep and kill them (this is the only way to get wool outside of shearing which requires shears) until you have 3 pieces of wool (color doesnt matter).


use 3 parts each of wool & planks to make a bed. This is VERY important.


place the indoors... & try not to die until you sleep in it (sleeping in a bed will auto save it as your spawn point if you die, however you cannot use it until night).


well that was the basics for survival, this tutorial should work when you spawn near or in a forested area. Good luck, and fun crafting!

Like my post? Follow and share my blog with your fellow Minecrafters!


Friday, May 10, 2013

I have been busy...

Ok to those of you who read my blog I want to apologize for not posting in a while; I have been very busy lately. My next post will be how-to tutorial for surviving the first first days & nights of MC, I will try to have it done by Sunday (like i said, i am busy).


Wednesday, April 17, 2013

Minecraft Crafting Recipies: Tools (and their uses)


 I am sure that most people reading this blog are already acquainted with crafting recipies... however those of you who are noobs may find this post helpful.
To craft the first 4 items in this review, you need 2 types of materials; sticks, and the material you want the tool to made of. The materials that can be used are gold, wood, cobblestone, Iron, & Diamond (in order of weakest to strongest). For the first 4 tools in this review I used cobblestone (notice that you arrange materials in the crafting window to resemble the item you are trying to make).


Axe

 To make an axe, take 2 sticks & 3 pieces of the material of your choice and arrange as seen in the pic above. Simply click on the finished product and drag into your inventory or toolbar.
Axes are used for breaking wood-related blocks, and also work as a makeshift weapon.

Pick-axe
 To make a pick-axe, take 2 sticks & 3 pieces of the material of your choice and arrange as seen in the pic above. Simply click on the finished product and drag into your inventory or toolbar.
Pick-axes are used for breaking stone, ores, & related items.

Shovel
 To make a shovel, take 2 sticks & 1 piece of the material of your choice and arrange as seen in the pic above. Simply click on the finished product and drag into your inventory or toolbar.
 Shovels are used for breaking dirt, sand, & gravel.

Hoe
 To make a hoe, take 2 sticks & 2 pieces of the material of your choice and arrange as seen in the pic above. Simply click on the finished product and drag into your inventory or toolbar.
A hoe is used to till ground for planting, to use right click on a dirt block.

 Torches
 To make a torch, place 1 stick under a piece of either coal (mined the same as stone) or charcoal (obtained by smelting wood in a furnace). Simply click on the finished product and drag into your inventory or toolbar.
Torches are placed to light up areas to stop hostile mob spawning, and to aid seeing in dark areas.

 Bucket
 To make a bucket arrange 3 iron ingots (only iron ingots work, Iron ingot are obtained by smelting iron ore) as seen in the picture above. Simply click on the finished product and drag into your inventory or toolbar.
buckets are used to carry milk, water, or lava.

Shears
To make shears, arrange 2 iron ingots as seen in the picture above.Simply click on the finished product and drag into your inventory or toolbar.
Shears are used to gather wool from sheep without killing (right click on sheep), and to gather leaf blocks.

Flint & Steel
To make flint & steel arrange 1 iron ingot & 1 flint as seen in the pic above. Simply click on the finished product and drag into your inventory or toolbar.
Use flint & steel to light fires.


Like my review? Follow and share my blog with your fellow Minecrafters!